
Additional Xero Invoicing Setup
This article is intended to be looked at after following the instructions on the previous setup. A lot of the setup here is optional.
Contacts
Your existing Xero contacts are listed at Admin → Integration → Xero → Contacts. You can manually link participants to contacts here, or if invoicing for a participant who isn't linked to a contact then Xero will link it to a Contact automatically if there's one with a matching name, otherwise it will create new contacts.
You likely have your Contacts from Xero in CareMaster already, but you can always confirm by clicking the Get From Xero button. 
Each contact has a link button to the far right of it, which is where you can create/edit the links between that contact and participant records within CareMaster. A contact can have multiple participants linked to it, and each participant can have separate contacts for supports using different Service Organisations (eg one contact for NDIA Managed, another contact for Self-Managed) but otherwise participants cannot have multiple contacts.
Products and Services
Admin → Integration → Xero → Products and Services
This is where you can (optionally) sync products and services from Xero and link them to CareMaster services. You can also create new items in Xero from this section as well. To link these services or create a new one, click on the Items → Services button.
This page shows you a list of Services within CareMaster with their Service ID (internal use) the Service Organisation, the Service name and a Link Status column. The colour of the button indicates the status of the link for that service, and allows you to edit it.
 | This means that there isn't a link for this Service, click on this button to create one |
|---|---|
 | This means that there is a link for this service, click on this button to edit it |
 | This means that there is a link for this service, but the Xero item cost and CareMaster Service cost don't match. You can use this button to unlink the service, or edit the link. |
Xero items and Services can't be linked automatically, but you can create Xero Items if you wish.
When editing/creating a line, if the 'Use Existing Xero Item' tickbox is unticked then you'll see a page like this;
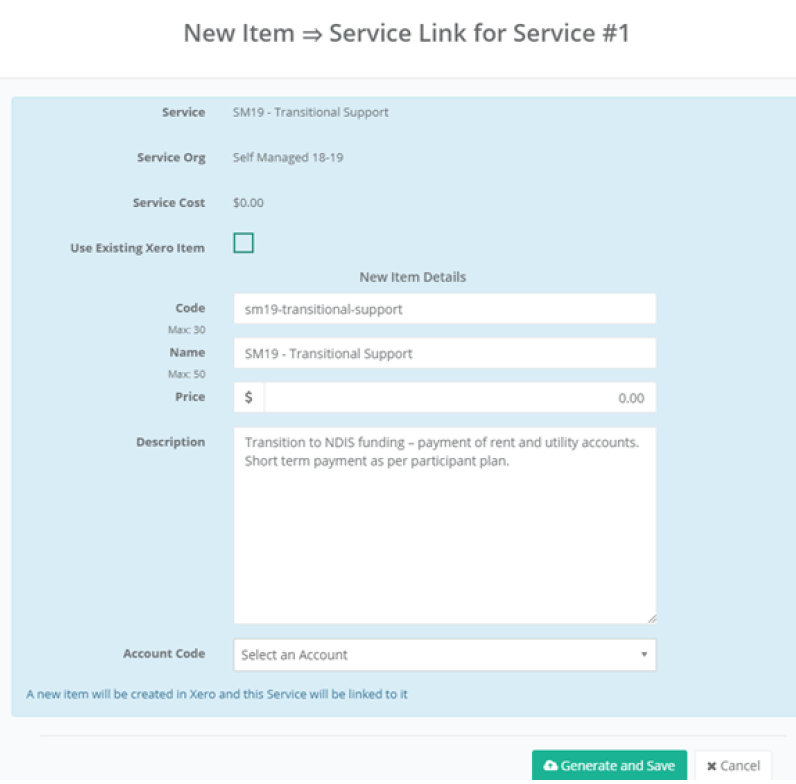
Using this will create an item in Xero and automatically link the selected Service to it. You can change the prefilled/suggested information, but the maximum lengths are imposed by Xero and cannot be changed.
You can generate items manually as per above, or automatically using the 'Create 50 Items in Xero' button. 
This will create items with the prefilled information as per the above example. There may be some failures when doing this because of it working with Xero limitations, you will be notified of any warnings and can create any leftover services manually as per above.
Tracking Categories
You can use this section to assign Tracking Options for Invoice Line items and Timesheets if desired. As this section is related to payroll as well, its recommended that you consult the Xero setup guides for that first to make sure that those settings are correct. You will also need to have made sure your Tracking Categories are correct and up-to-date in Xero so CareMaster can use these correctly.
Navigate to Admin → Integrations → Xero → Tracking Categories from the main menu, and then click on the Service Org Links button. Consult the  icon here for more detailed information on how to proceed, this is tailored to what information you do or don't already have in CareMaster.