
How to Send Timesheets to Xero?
Caremaster does not handle one off or unscheduled payruns, these must be done manually on Xero side,
The following are required to use these settings:
- Be an Admin user in CareMaster
- Have already connected your CareMaster to Xero
- Have already synced earnings rates from Xero
- Have already synced Employees from Xero as Workers in CareMaster
Recommended steps to follow before continuing:
- Set your Default Earnings Rate Assignments in the Settings → Xero page
- Set your Timesheet Event Auto Earnings Rate settings in Data → Support Worker Data → Timesheet Events (where applicable)
Preparing Timesheets to Sync
If you have activated the setting Only show and sync admin-approved timesheets in Settings → Xero then you will first need to approve the timesheets you want to sync.
This can be done by navigating to the path: Staff/Volunteers → Timesheets
In the Worker Timesheet Entries list, Admin Approved timesheets are shown in Green, unapproved timesheets in Yellow, and entries with invalid times or that cannot be synced are shown in Red.

To approve a timesheet, click the Yellow X to toggle the timesheet’s approval status.
To un-approve a timesheet, tick the Blue ✓ to toggle the timesheet’s approval status.
To approve multiple timesheets at once, tick the selection box and click the Approve Selected button.

Syncing Timesheets
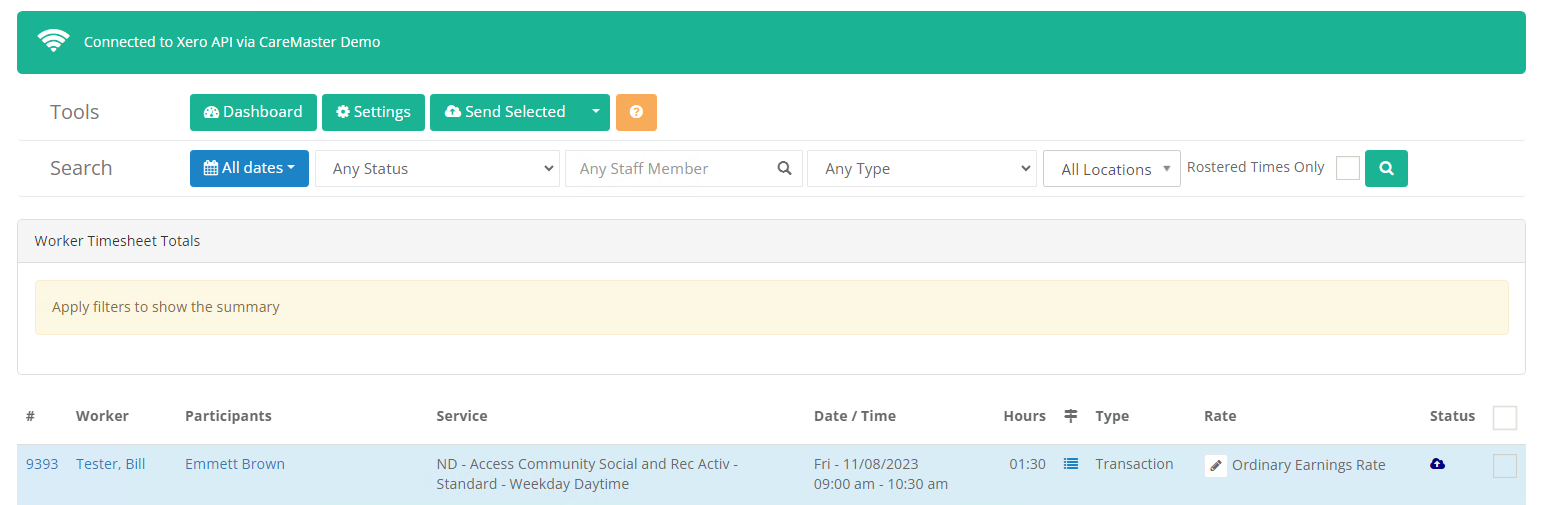
Navigate to Admin → Intergrations → Xero → Timesheets.
On the Xero Timesheets page, the list of timesheets includes some details including the Rate the timesheet is expected to be using, the status of the timesheet, and a selection box.
Timesheets that have already been synced to Xero, that are invalid, or that are for workers that are not correctly synced with Xero, will not have a selection box and cannot be synced.
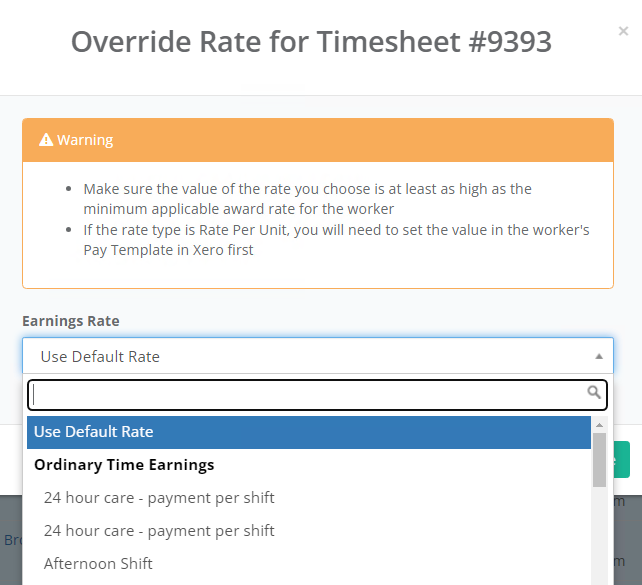
If desired, you can manually specify the Earnings Rate for a particular timesheet by clicking the edit icon next to the timesheet’s rate.
This button is not available for timesheets that have already been synced or for workers that are not synced correctly with Xero.
 Ordinary Earnings Rate
In the popup, select the rate you want to use for this entry and click Save.
When you are ready to sync timesheet entries to Xero, select the checkbox for those entries and tick the “Selected” button. Alternatively, clicking “Send All Pending Timesheets” will send all valid and ready timesheets at once.
If successful, you will get a “success” message and the timesheets list will refresh with updated status icons. The message may also indicate that some timesheets were unable to be synced.
When you are finished syncing timesheets from CareMaster to Xero and you are ready to add them to a Pay-Run, log in to Xero and navigate to Payroll → Timesheets
Inspect the timesheets and when ready, select the draft timesheets and tick the Approve button.
Next Step: Payruns
Explanation of Timesheet Sync Statuses
For most Status icons in the Xero Timesheets list you can hover over the icon to get an explanation.
The timesheet has been successfully added to Xero.
 The timesheet is valid and ready to be synced to Xero.
**  **There is a timesheet in this period already in Xero that is not set to draft: You cannot sync a timesheet if the Employee already has a timesheet in Xero that is not set to draft, because changes cannot be made to that timesheet. You should log in to Xero and set the timesheet to “Draft”.
 The timesheet is for a period with an existing posted or draft pay run: This status means that the entry you're trying to sync is before the Pay Calendar's start date. The most common reason is that you have a draft or posted Pay Run for that period. You cannot add timesheets if there is a draft or posted Pay Run for that period. If you have a draft Pay Run for the period you should log in to Xero and delete it. If the Pay Run has already been posted, you will need to action an Unscheduled Payrun to include the approved timesheets that were not included in the original Draft Payrun. If you are in a demo or trial organisation or you have recently created the Pay Calendar in Xero, make sure you have set its start date early enough to cover the timesheet period you're trying to add to.
 The user for this timesheet does not have a valid Xero Employee ID in the database: This worker has most likely not been properly synced with Xero.
 The user for this timesheet does not have a valid payroll calendar: Syncing a timesheet requires that the Employee have a valid calendar set in Xero. If you have already set the calendar, you can re-sync the workers in Admin → Integrations → Xero → Workers. If you have not already set a calendar, you can do so in Admin → Integrations → Xero → Workers → Check Pay Rates.
No valid earnings rate could be found for the timesheet: You may not have correctly set your Earnings Rate Assignments in Settings → Xero. For example, the timesheet may be for a Saturday, you haven’t set a Saturday rate, and you have the setting Default to Ordinary Rate if rate not assigned deactivated.
The timesheet had an invalid time or had total hours = 0: You should edit the timesheet to ensure it has a valid start time, end time, and that it has a positive duration.