
Incidents User Guide
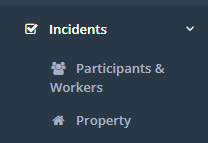
Any incidents can be logged and recorded from here. After clicking on the main menu, you can further select from the menu to show only Participant/Worker or Property incidents.
Green rows indicate resolved incidents, yellow indicates active incidents.
By selecting More Filters you can filter any existing Incidents. There is also a blue PDF/Excel button on the right, where you can export all or filtered incidents to an excel spreadsheet or PDF.
The filter categories are:
- Staff - Use this field by entering in the Staff/worker that you would like to filter incidents for.
- Participant - Use this field by entering in the Participant/Client that you would like to filter incidents for.
- Search text fields - Use this field to search for a particular incident number or ID number.
- Location - Using the drop-down box, select the location you would like to filter for.
- Category - Using the drop-down box, select the category you would like to filter for, example: Accident, complaint, complement, etc.
- Severity - Using the drop-down box, select the severity you would like to filter for.
- Status - Filter the incident list by status of incident.
- Date/s To - Use this field by entering in a date in 00/00/0000 format in either/both the field/s provided. Or click in the field to bring up a calendar to select the date. This will show the incident based on the date it occurred.
- Date reported - Use this field by entering in a date in 00/00/0000 format in either/both the field/s provided. Or click in the field to bring up a calendar to select the date. This will show the incident based on the date it was reported.
- Vehicle - using this field you can search on the vehicles listed in an incident report
To the right of each incident there are 3 buttons:
Click on Edit to update/edit the incident or Details to just see an overview of the entered details. If you click on the Cross to mark the incident as Active or Resolved, and clicking on the red Bin icon will delete the incident.
To create a new incident, click on the green New Incident button up to the top right. Enter in all details as below and click Save when finished:
- Incident number: This field is optional. Some organisations like to add there own incident numbers for reference purposes.
- Status: You can select from Active or Resolved.
- Category: Place the incident in a category for better sorting. Categories can be created/edited in Settings > Incident categories
- Severity: Select the severity of the incident using the drop-down box.
- Staff involved: Click into the provided field to bring up a list of staff and select the staff member/s involved.
- Participant: Click into the provided field to bring up a list of participants and select participant/s involved.
- Reported By: Click into the provided field to bring up a list of Staff/admin and select appropriate name.
- Vehicle: Select an existing vehicle if applicable.
- Date and time reported: Enter in the details of when the incident was reported
- Date and time occurred: Enter in the details of when the incident occurred.
- Date and time ended: Enter in the details of when the incident ended
- Duration: Enter in a duration of how long the incident occurred for.
- Cost: Note any costs associated with the incident.
- Description: Use this field to enter the details of the incident in as much detail as possible.
- People Involved/Witnesses: Use this field to enter the details of the people involved in the incident, including witnesses and third parties.
- Action Taken: Use this field to enter the details of the action that has been taken in regards to this incident.
- Location: Select a location using the drop-down provided.
- Reportable: Tick this if the incident needs to be reported to another department or higher up.
- Read Only: Tick if you don’t wish for this incident form to be edited after its creation
- Internal Report Only: Is not visible on worker or client app
After an incident has been created, you can edit it and upload related documents as needed.
Workers have the option to report incidents through both the worker app and the web portal. When workers have access to the web portal, they are limited to viewing only the incidents they themselves have created.
Within the web portal, workers can:
- Report new incidents.
- Modify incident records they initiated.
- Workers cannot make changes to incidents that have already been resolved.
- Workers cannot mark an incident as resolved or active.
Incident notifications
CareMaster can send an email when a new incident is created by a worker on the app. This setting is located in Settings > Worker App Settings. You can select who receives an email when an incident is created under Incident Created Notifications