
MYOB Online Setup
This process will assist you in setting up and configuring your MYOB Online product Integration with CareMaster.
\
Importing the MYOB Accounts list into CareMaster.
In MYOB Online go to Reporting and Reports and select Categories List.
You will need to customise the columns for this export. You will need the columns:
Code / Name / Type / Account Description / Tax Code / Status
Press Apply and Export to Excel and open the file to allow editing.
Delete for first 6 rows and any blank rows.
Rename the columns to match the CareMaster fields and add an extra column named Header in column E.
Update column G’s name from Status to Inactive Account and the values of ‘Active’ to ‘N’ and ‘Inactive’ to ‘Y’
Save this file as a CSV and it available for upload
To import the MYOB Accounts list into CareMaster, Go to the Admin Menu, MYOB & Accounts.
Click on the Choose File button to select the CSV file.
Press the upload button to import the MYOB accounts into CareMaster

Your MYOB Account List has now been imported into CareMaster.
\
Setting up your Chart of Accounts
Now you have your Accounts imported into CareMaster, you can assign these to your Chart of Accounts in CareMaster.
Go to your MYOB Dashboard and select Settings.
On the right hand side choose your different Chart of Accounts from the dropdown for:
Wage and Salary Expenses
Employee allowances (generic)
Employee travel allowance
Default services income
\
Setting up your Tracking Categories
Your Tracking categories let you assign Categories in Invoices to your Service Organisations,
Using this feature, you can have Invoice Lines for Services belonging to a particular organisation, use a specified Category when exporting an MYOB csv file.
Go to the MYOB Dashboard and Tracking categories.
Here you can see the existing categories that will appear on the export file.
Press + new category to create a new one. Give it a category name and a description if you need and Save. Click on Service Org links to see the Service Organisations available for linking.
You can search by name or link status.
For a new connection, edit your required Service Organisation, and choose a category to link to and save link.
To remove a connection, edit the relevant Service Organisation and Unlink.
\
Setting up the MYOB Payroll Categories in CareMaster
Before you can begin the timesheet process. The organisation’s MYOB Payroll Categories will need to be entered into CareMaster. The Payroll Categories are matched by name when importing timesheets into MYOB.
Please note, the Payroll Categories must be entered manually into CareMaster, identical to how they appear in MYOB. Currently MYOB does not have the function to export the categories.
To add the Payroll Categories, in CareMaster go to menu Admin > MYOB > Payroll Categories
Click on the New Payroll Category button.

Enter the Payroll Category description and select the category’s Type from the drop-down list and press Save.
The description must be identical to how it is appears in MYOB.
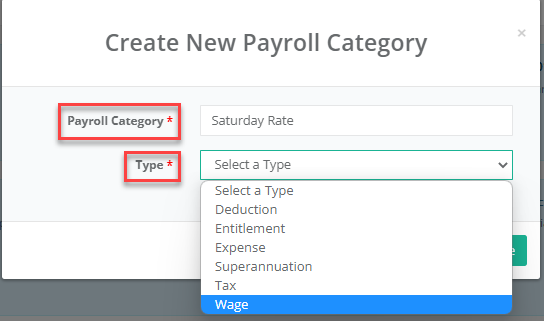
Repeat this process for all your organisation’s MYOB Payroll Categories.
Alternatively, you can press the Generate Categories button to create the payroll categories in accordance with the SCHADS Award automatically in CareMaster and then add them into MYOB. The Payroll Categories will need to be entered into MYOB exactly as they appear in CareMaster.
To generate the Payroll Categories in CareMaster, click on the Generate Categories button.

\
Setting up the MYOB Payroll Categories in MYOB Online
To create your matching payroll categories, in MYOB go to the Payroll menu and Pay Items.
Select Create Wage Pay Item
Enter the exact Name as per CareMaster and add a payslip name as well.
Assign an ATO Reporting Category as per the reporting category guidelines.
Depending on the Pay Item, select Salary or Hourly then the relevant pay rate and fixed or multiplier number. In this example Afternoon shift is an hourly 1.125% of the base rate.
Press Save and continue to do this until all Pay Items / Payroll categories have been setup.
\
Assign the Earning Rates and Assignments
Go to Admin menu > MYOB > Settings
Scroll all the way down the page until the MYOB Payroll Category Assignment settings.
Select the SCHADS Award from the dropdown list
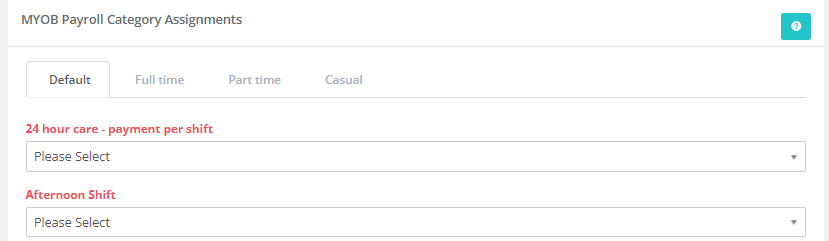
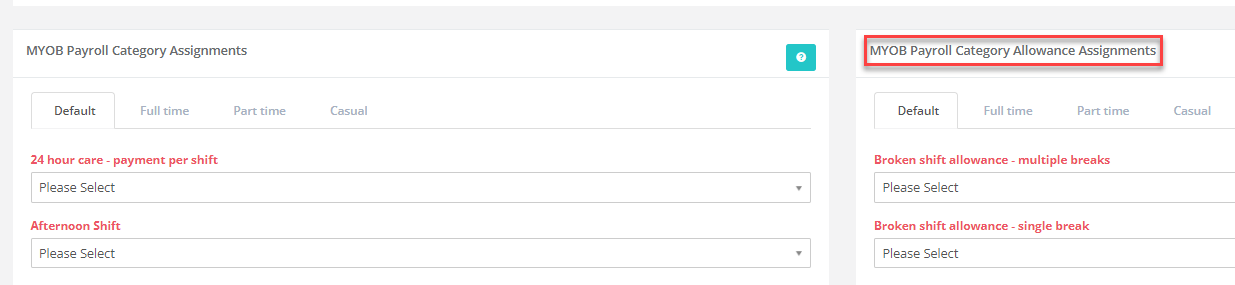
Assign the required payroll category to each assignment.

Repeat the same process for the MYOB Payroll Categories Allowance Assignments, Default Tab and Save Assignments.
\
Participant & Worker ID
Your participants and workers need to have an ID in CareMaster that matches an ID in MYOB for the invoicing and payroll data to sync correctly.
\
Assigning the Participant MYOB Card ID
All participants need to be set up in MYOB with their first name and last name. Identical to what is in CareMaster. MYOB also matches the participants Card ID field. If these do not match, their invoice data will not be imported into MYOB.
In CareMaster, go to each participant’s profile and click edit in their Service Provider Tab. Scroll down to the Card ID field to enter the participants MYOB Card ID number, then press Save.
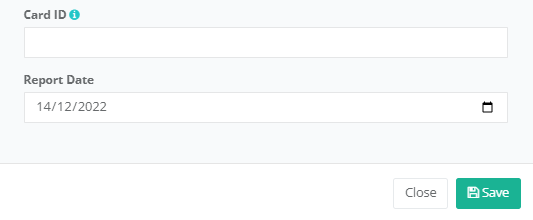
Repeat the process for each participant within the organisation.
\
Assigning the Worker’s Employee Number
This process will need to be completed for each staff members worker profile in CareMaster.
Go to the worker’s profile. Menu Staff/Volunteers > List.
Go to the worker’s Employment Information tab and press the Edit button.

Enter the workers employee number.
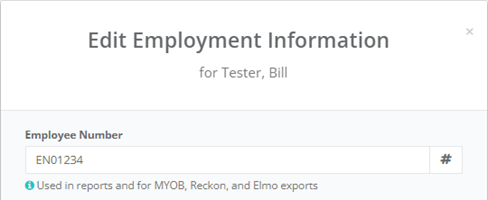
The Employee Number in CareMaster, must match the employees MYOB Employment Card ID number. MYOB requires this information for the timesheet import file.
After entering the information scroll down the screen and press the Save Button.