
User Guide: Supported Independent Living (SIL) Setup, Rostering and Claiming process
Supported Independent Living (SIL) Setup, Rostering & Claiming process
SIL Supports: Weekly claiming vs Hourly claiming.
Refer to the support item/s outlined in the SIL participants service agreement. The participant will have either the Hourly or Weekly service items.
Providers cannot use a combination of Weekly and Hourly SIL supports. A provider will use either the Weekly SIL support item or the Hourly SIL support items, but not both methods.
Hourly SIL Supports
Hourly SIL Service Items are scheduled in CareMaster using the same process as Individual and Grouped Supports. Refer to the User Guide: How to create supports
Weekly SIL Supports
If the participants Service Agreement has the Weekly support item allocated.
Refer to the steps in this user guide.
Step 1: Settings.
Review settings on the Weekly Billable SIL Service Item.
If your organisation provides SIL supports to NDIS, Plan and Self-Managed participants. The process below will need to be repeated for each corresponding Service Organisation and the weekly billable SIL support item. 01_821_0115_1_1 Assistance in Supported Independent Living – Weekly.
In CareMaster go to menu Admin > Service Organisation.
Click the Edit button on the right of the service organisation. Example: Plan Managed, Self-Managed or NDIA.

Click on the Services Tab.
Search for service item 01_821_0115_1_1 Assistance in Supported Independent Living – Weekly
Press the search icon to display the support items.

Click the Edit button next to the support item.
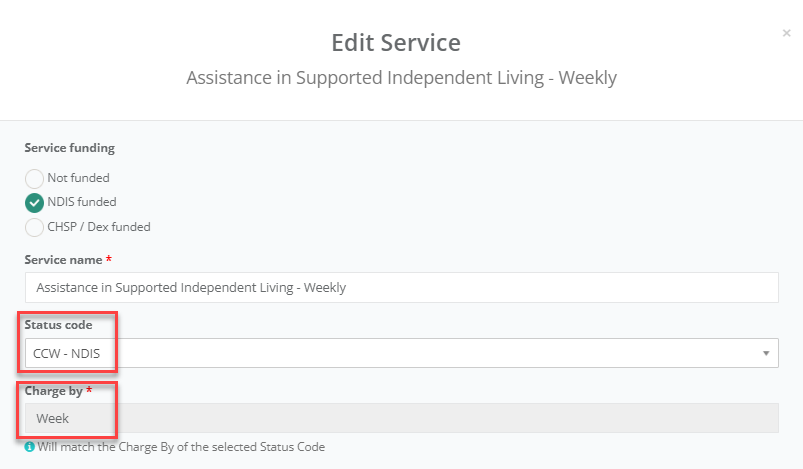
All weekly billable SIL support items, have their Status Code set to CCW-NDIS. The Status code sets the service item’s Charge By field to Week
Scroll all the way down your screen to the Exclude from roster tick box and tick Yes.
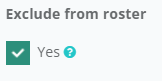

Excluding the support from the roster, enables you to invoice the participant and prevent the billable support being displayed on the worker’s roster.
Press the Save Button, repeat the process for each Service Organisation and weekly SIL Service item.
Step 2: Worker Timesheets Setup.
Create a SIL Service Organisation and Service Items for worker timesheets.

The next step is to create the SIL Service Organistion and Service Items for the purpose of generating the workers timesheets. This allows you to pay the workers hourly, without invoicing the participant. The participants will be invoiced via the Weekly Billable SIL Service Items.
Go to menu Admin > Service Organisation.
Click the New Service Organistion button.
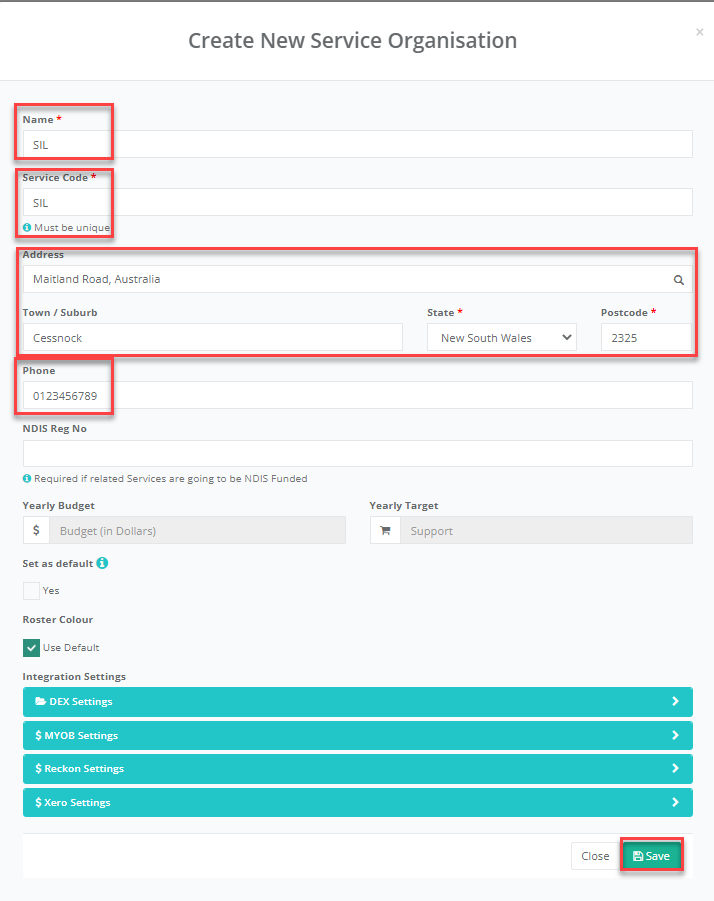
Enter the new SIL Service Organisation details, then press the Save button.
Name
Service Code
Address
Phone
After the SIL Service Organistion details been saved, click on the Services Tab.
Click on the Create New Services Button.
Complete the fields below to create the worker timesheet items.
Service Funding = Not Funded
Service Name = Name of Support. E.g. Weekday, Sleepover, Saturday
Status Code = Select CCH – NDIS This will generate Hour within the Charge by field.
Unit Cost = $0.00. You will need to type this into the field
Overnight Services (optional field). Tick Yes if the service item is for a Sleep Over. Tick Active Overnight if the service item is for an Awake Support.
Press the Save button.
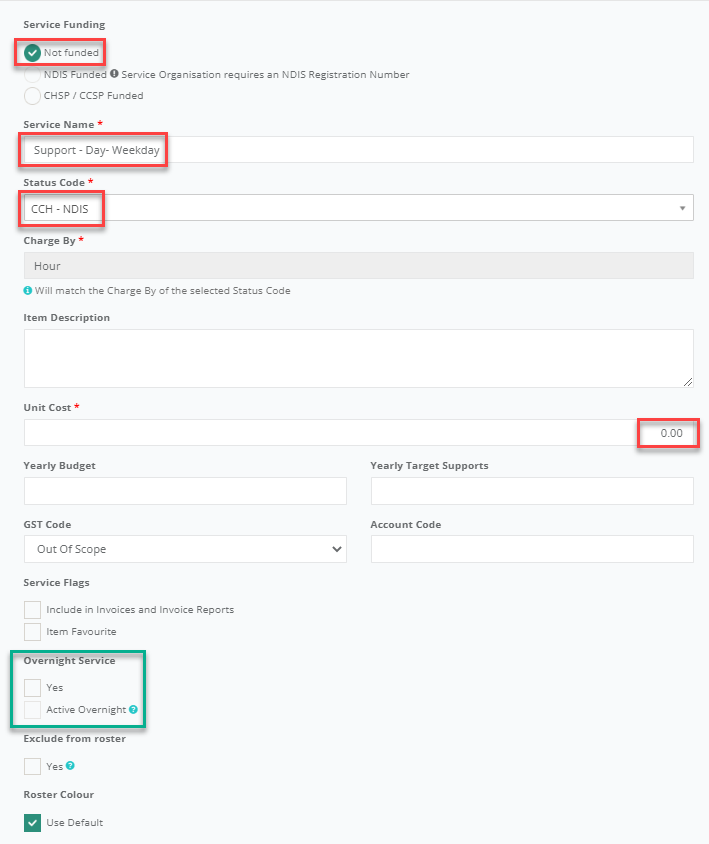
Repeat the process for each worker timesheet item. Example: Day, Afternoon, Evening, Sleepover.
Step 3. Link Timesheet Service Items to the SIL Participant’s profile.
Linking the timesheet service items to the SIL participants profile, enables the workers timesheets to be generated. The timesheet service items will not generate invoices.
Repeat the process below for each SIL Participant.
Open the participant’s profile.
Scroll down to the Approved Services Tab. Click on the dropdown arrow next to the name of the new SIL service organisation and select the worker timesheet service items. Refer to the example below for the SIL service organisation.
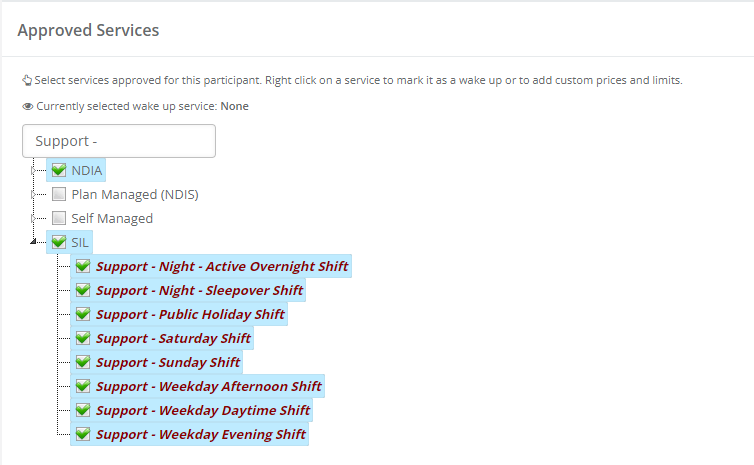
The timesheet service items will be used to roster the supports with the SIL participant.
To assign the wakeup support feature, right click on the sleepover service and mark it as the service for wake up.
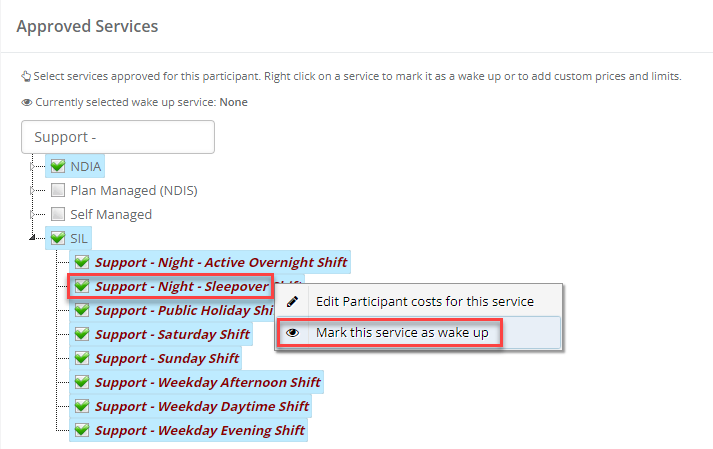
Please note: To display the awake button in the worker app, the Show Overnight Wakeup Button in the Worker App settings must be set to true. Ask your System Administrator to amend the settings. Settings > Worker App Settings.

During a Sleepover support if the worker presses the wake-up button in the app. The app will prompt the worker for the number of hours the worker was awake. CareMaster then creates a support for Active Overnight.
Step 4. Scheduling the SIL Supports to generate Worker Timesheets.
When the workers log on and off their SIL support correctly, CareMaster generates the workers timesheets. If the worker fails to do this, the supports will need to be checked and the missing timesheets generated in CareMaster.
Open a new Support screen and enter the Support date, Start/End time and SIL Participants name.
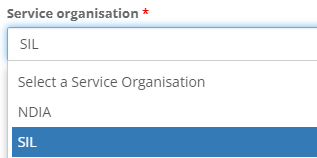
Select the SIL Service Organistion, refer to the example below,
Select the required timesheet service item to display on the worker’s shift.
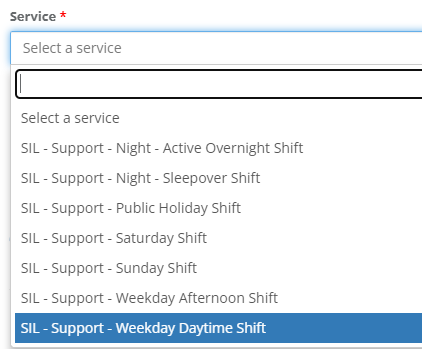
Assign the worker to the support and press the Save Support button.
Refer to the CareMaster Supports User Guide for further information regarding the scheduling process.
Step 5: Billing. Scheduling the billable SIL Supports for Invoicing.
This process explains how to schedule the participant’s Weekly Billable SIL Support. After the supports have been marked as Checked it will be ready for invoicing.
To view the Weekly Billable Supports after it has been saved go to menu Supports > All. The Weekly Billable support will not appear on the rosters. Refer to Step 1 for additional information regarding the setup of the weekly SIL Service item.
The participants weekly billable support can be created as a recurring support.
Open a new support screen then tick the recurring support checkbox. Enter the weekly recurrence details
Enter the support date and time 00:00am to 23.59pm.
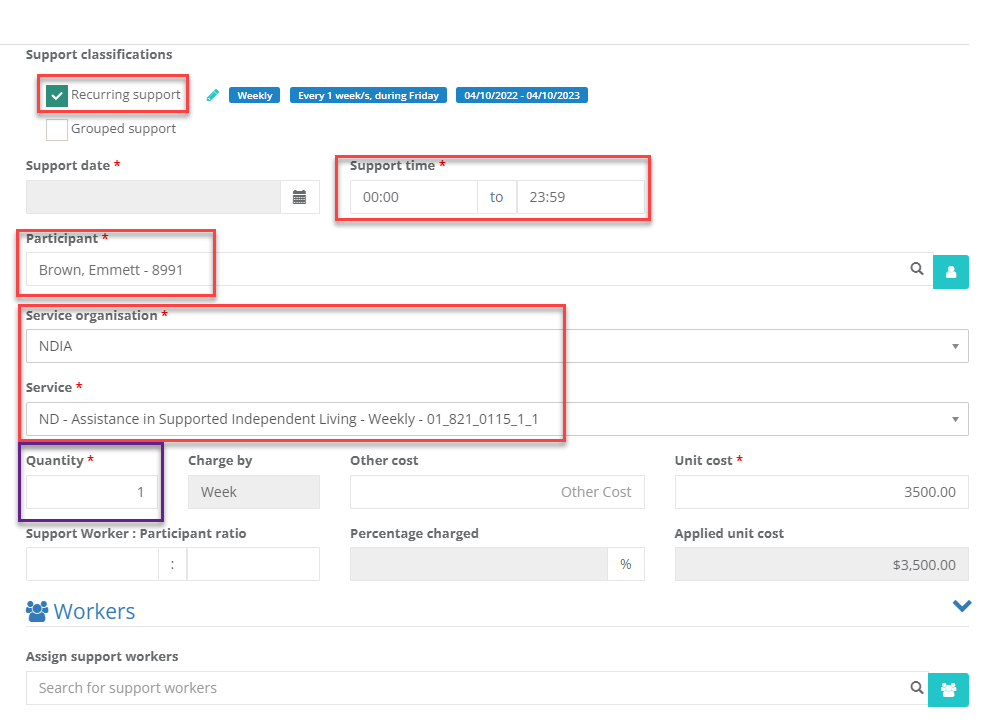
Select either the participants NDIA, Plan Managed or Self-Managed Service Organistion and SIL Service Item. 01_821_0115_1_1 Assistance in Supported Independent Living – Weekly.
Enter 1 in the quantity field. 1 = 1 day (refer image above).
Assign the support worker/s (optional)
Scroll down the support screen to the Status flags and tick Checked. (This will enable the weekly billable support to be invoiced).
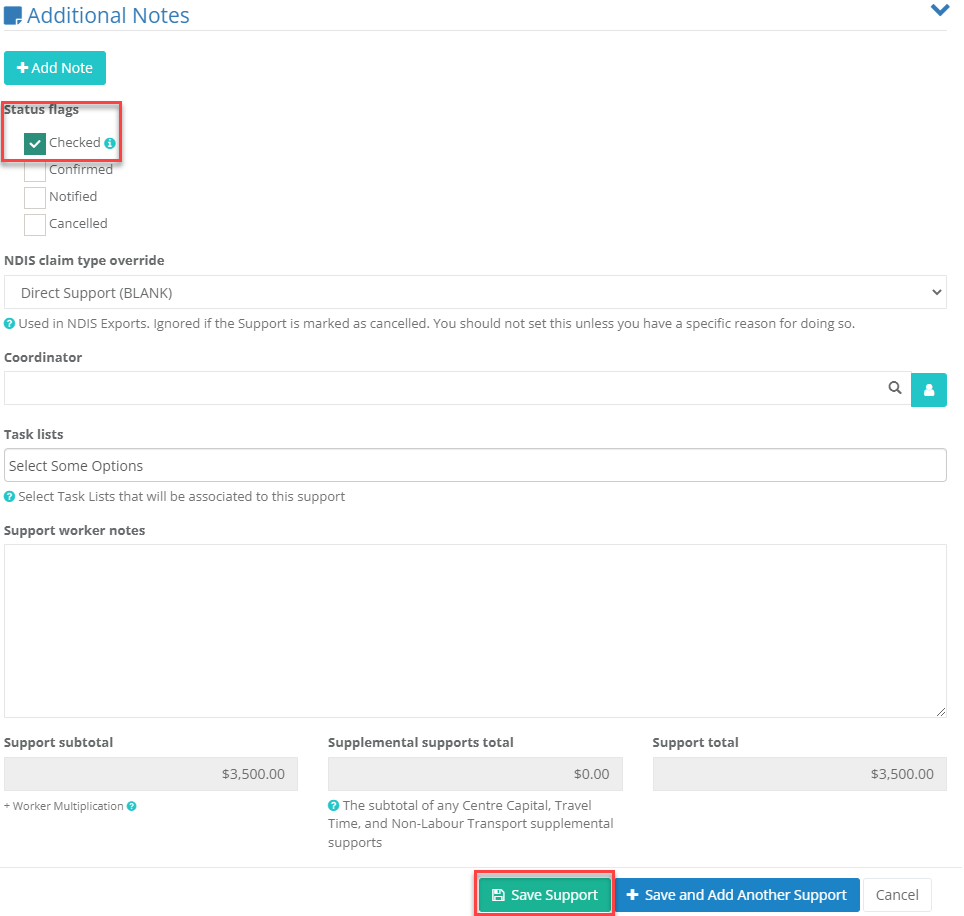
The support is now ready for invoicing.
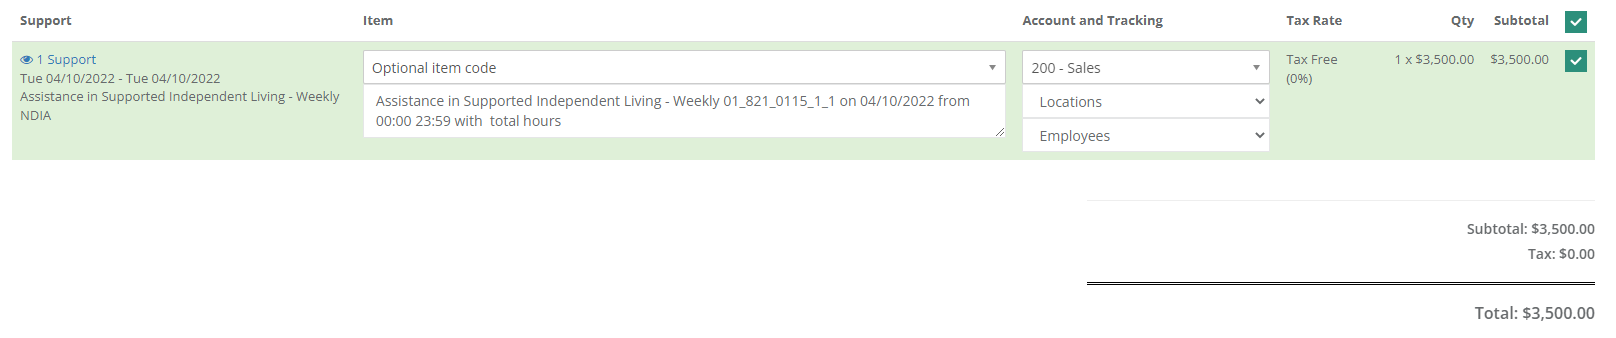
Refer to the CareMaster Invoicing guide to generate the SIL Participants invoices.