
User Guide: How to create supports
How to create supports
There are 3 ways to create, view and edit supports in CareMaster. Each way will direct you to the same support screen.
Via the Worker and Participant Rosters
-
Ideal for those who are visual in their approach
-
A great way for creating supports at short notice
Via the Supports All menu - Click on the New button
- Ideal for creating Group Supports.
- A more data-driven way to create supports in the system
Via the Participant’s Profile - Supports Tab
-
Ideal for Support Coordinators.
How to create recurring supports
Using your preferred method, open a new support screen.
When creating recurring supports that run over several days a week. example Mondays & Wednesdays. Create the Mondays and then Wednesdays as separate recurring supports. To avoid any headaches should the participant make any changes. Recurring supports can be used for individual, and group supports.
At the top of the support screen, click the Recurring check box
Select the recurring frequency i.e. Daily, Weekly or Monthly
Enter the start and end date.
Enter how often the support is to occur, during your designated date range.
Example: If the support frequency is set weekly and the support occurs every week, enter the number 1. If the support occurs fortnightly enter the number 2.
If the Support Frequency is set to Weekly select the day the support is to occur.
The support in the is example would occur every 2nd Monday from the 07.07.2022 to 07.11.2022.
If the support frequency is set to Monthly select from either option:
Day # of Every # Month
OR
The ___ of every # month(s) on:
Select the day the support occurs.
Press the Set button to save the recurrence pattern.
After pressing the set button. The recurring pattern is displayed on the support.
If you need to edit the pattern, click on the pencil button.
Continue to schedule your support.
How to create a 1:1 (individual participant) support
Using your preferred method, open a new support screen
Enter a Support Date and Support Time. Add a different timezone for supports out of your core location. See the complete online resource here!
In the Participant field, begin typing the name and select the participant from the drop-down list.
Select the required Service Organisation and Service Item
CareMaster will calculate the quantity field and display the service item’s unit cost.
The support total is displayed on the left of the support screen.
The next step is to assign the support worker.
Why can I not assign a worker? For the worker to appear as an option the workers profile user level needs to be set to worker or have an additional assignment type of worker. This is available on the workers profile under Organizational Information.
If the worker is not known when support is being created. The field can be left blank. After the support is saved, it will appear in Unassigned field on the worker’s roster.
==If the support includes Travel and/or Transport.==
==Within this guide refer to:==
==How to create supports for for Activity Based Transport==
==How to create supports for Provider Travel==
If the service item allows claiming for Centre Capital Cost. Tick the Claim Centre Capital Costs checkbox and select the required service item from the list.
Scroll down your screen to the coordinator field and enter the manager’s name. (optional)
Add a Task list to the support (optional)
Task lists are a great way to identify the items that need to be completed during the support. The worker can tick the items off via the worker app. Please contact your system administrator to create the task list.
Enter any additional support notes, for the workers to view in the app
Scroll down your screen and press the Save Support button.
==After the Support has been saved it can be viewed/edited on the:==
- ==Participant’s profile==
- ==Supports menu==
- ==Worker or Participant Rosters==
How to create group supports
Using your preferred method, open a new support screen.
At the top of the support screen, click the Grouped Support check box.
Enter the Support Date.
The next step is to add all the participants names in the group.
In the Add Participant field, begin typing the name and select the participant from the drop-down list. Repeat this process for each participant in the group.
For each participant in the group:
- Enter their Support Time
- Select their required Service Organisation and Service Item.
- Assign the Support Worker/s.
If the service item allows claiming for Centre Capital Cost. Tick the Claim Centre Capital Costs checkbox and select the required service item from the list.
Scroll down your screen to the coordinator field and enter the manager’s name. (optional)
Add a Task list to the support and enter any additional notes. (optional)
Before saving the support. If the participants service items do not include a predefined ratio.
Example: Group Activities - Standard - Weekday Daytime.
Scroll up and press the Recalculate Ratios button. CareMaster will identify the support ratio
Example: 1:2 and calculate the percentage charged to each participant as well as displaying the updated applied unit cost
The total displayed on the left-hand side of the support, is calculated from individual participant’s support cost totals.
Scroll down your screen and press the Save Support button.
==After the Support has been saved it can be viewed/edited on the:==
- ==Participant’s profile==
- ==Supports menu==
- ==Worker or Participant Rosters==
How to create Activity Based Transport supports.
Activity Based Transport refers to the transporting participants during a support. Providers can claim for the transports non labour costs (kilometres).
To add Participant transport to a Support. Tick the Include Transport checkbox for the participant/s
Additional fields will appear on the support screen.
The kilometre and the worker expenses can be left blank for the worker to populate via the worker app.
Alternatively, you can add the Kilometres and Worker expense if you know the details.
Click in the Non-labour Transport Cost Service field.
Select the service item the kilometers and transport expense need to be invoiced to.
This process will create the child support for kilometres.
Assign a vehicle to the transport support.
If a company vehicle is missing from the list, please contact your system administrator.
If Own Vehicle is selected the support’s kilometers will be added to the workers timesheet.
Continue to schedule your support.
Within this guide refer to:
- How to create a 1:1 (individual participant) support.
- How to create group supports.
For additional Activity Based Transport support creation scenarios, refer to User Guide: Provider Travel and Transport - Rostering Scenario Guide
How to create Provider Travel supports
Provider travel refer scenarios when a provider is able to claim for worker time when travelling to deliver supports to a participant based on the NDIS Provider travel information.
For example, if a provider delivers a 2 hour support and the worker has travelled 15 minutes to the appointment, the provider claims 2 hours as a standard claim, and claim 15 minutes separately as a travel charge.
Providers can also share the cost of travel among the scheduled participants in regional, remote and very remote areas, as long as it is agreed with the participants in advance.
For example, if a worker travels two hours for a round trip to provide services to four participants in a regional area, each participant will be charged 30 minutes of worker travel time, regardless of the actual travel time between participants.
To be able to claim for provider travel, the process requires you to create the support by selecting the Grouped Support check box at the top of the support screen.
Enter the support date.
In the Add Participant field, begin typing the name and select the participant.
Enter the direct support’s time.
Select the required Service Organisation and Service Item.
Assign the support worker.
Next to the Participant’s name, press the Duplicate Support Button.
Select the same participants name again and press the duplicate button.
Scroll down to the participant’s duplicated support entry and adjust the start end time, to reflect the workers travel time.
Tick the Include Transport checkbox
Additional fields will appear on the support screen.
The kilometre and the worker expenses can be left blank for the worker to populate via the worker app.
Alternatively, you can add the Kilometres and Worker expense if you know the details.
Click in the Non-labour Transport Cost Service field.
Select the relevant Provider Travel – non labour cost service item. This will be service item the kilometers and transport expense will to be invoiced to.
This process will create the child support for kilometers expenses.
Assign a vehicle to the transport support.
If a company vehicle is missing from the list, please contact your system administrator.
If Own Vehicle is selected the support’s kilometers will be added to the workers timesheet.
For NDIA (Agency) managed participants scroll all the way to the bottom of the Support to the NDIS claim type override field.
Scroll down your screen and press the Save Support button.
==On the Supports> All Screen the support will appear as 2 separate supports,==
==The workers timesheet will display 1 entry which includes the participants support time and the Workers travel time.==
==The Xero Invoice will display the 3 service items being charged to the participant for the==
==Support Time, Provider Travel Time, and Kilometers Travelled==
==NDIS Export View==
For additional Provider Travel support creation scenarios, refer to User Guide: Provider Travel and Transport - Rostering Scenario Guide
How to edit supports
Using your preferred method, search for the support you need to edit.
Double click on the support, to open the support screen.
Edit the required fields
Scroll down your screen and press the Save Support button.
Introducing 'Quick Save' on the Supports Page
In our ongoing efforts to improve efficiency and performance, we've introduced a ‘Quick Save’ button on the edit support page. This feature is tailored to address your needs for speed and efficiency when working with our software.
The ‘Quick Save’ option allows for faster saving of supports by bypassing certain validation checks. This feature is particularly helpful when you're making minor changes, such as adding a note in recurring or group supports where many supports are updated, but a full validation check is not required.
Please note, 'Quick Save' is available only when editing existing supports, not when creating new ones.
You can easily access the 'Quick Save' feature by clicking the down arrow on the standard save button on the edit support page.
What 'Quick Save' Does Not Check
When using 'Quick Save', keep in mind that it skips several validation checks for quicker processing, including:
- Vehicle is in use
- Vehicle missing participant space types
- Worker on approved leave
- Participant over funding limit
- Support conflicts with blockout
- Removal of completed task list
- Participant on approved leave
- Worker with conflicting assignment
- Worker with support within minimum time
- Worker outside of availability
- Worker on pending leave
- Worker with expired qualifications
- Worker over maximum hours
- Worker incompatible with participant
- Participant with conflicting support
- Participant with trip or booking on the same day
While 'Quick Save' offers a convenient and faster way to save edits, it's important to use this feature appropriately. For more substantial edits where full validation is necessary, we recommend using the standard save function.
How to cancel supports
Using your preferred method, search for the support you need to cancel.
On the support screen scroll down to the Status Flags.
If the cancelled support needs be invoiced tick the checked status flag.
Then tick the cancelled check box and select the required cancellation reason.
Scroll down your screen and press the Save Support button.
How to delete Supports
You are able to delete a support by going to the Supports → All page. Filter as needed and on the far right of the columns there is the Delete icon.
 When you select Delete, it will ask you to confirm then advised the support has been deleted.
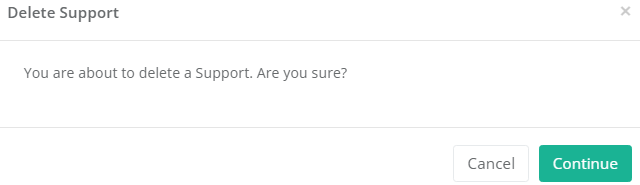

If your support is part of a Group or Recurring Support, you will need to provide additional selections based on the support type.
Grouped Supports You need to select if you are just deleting this specific support within a group transaction or you are wanting to delete ALL transactions associated with the group.
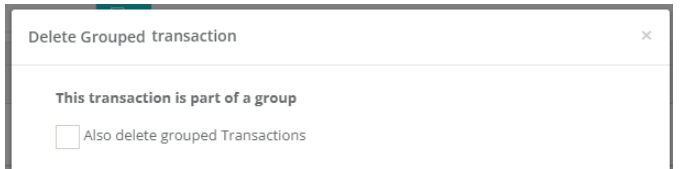 Make your selection and press Continue and the requested supports will be deleted.
Recurring Supports
When deleting Recurring supports, you need to define how much of the Recurrences will be deleted.
The options are:
-
Only delete this event
-
Delete this this and all following events from the chain
-
Delete all events in the chain\
When deleting all following or all events in the chain, please consider if it will effect any supports already Invoices, Paid or Exported
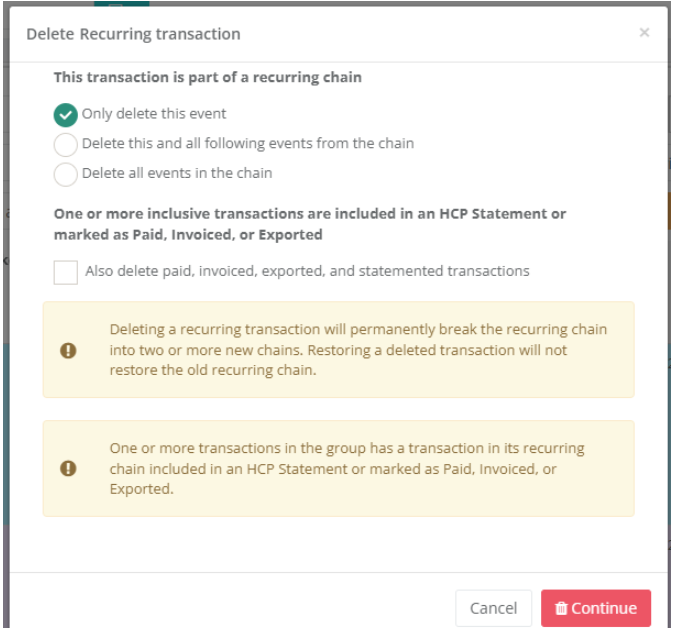 It will also show any additional flags such as it will break the chain into 2 new chains.
How to see who created or last updated/edited a support
You can view this information by editing a support and selecting the Payment Tab
How to restore supports
Please find this process via the link below.